Unity Debugging with ADB for Android

Hi Zulu here… (First of all … sorry for the cat)

Let me say straight off that your first port of call for any Unity debugging should be the Unity Console.

Though sometimes you need more low level operating system logging for Android. This is where ADB (in lower case) comes in.

On Windows this is a command line tool to view the logs from a connected Android device.

The command line is not the only way to use the tool sometimes it’s better to use the Android Studio interface (a bit more graphical).

You will need to have your Android device connected to your workstation and USB debugging turned on  (Google that if you need to). You could also use an Android emulator on your desktop.

I use Leapdroid or KoPlayer.  (Leapdroid have now joined Google and no longer support the emulator but it’s still available to download on the internet).  I guess you could also use the emulator that comes with Android Studio.

When your game is installed and running on your device go to the directory in your workstation (PC) where the Android SDK Tools are.

On mine they are here:

C:\Users\<user_name>\AppData\Local\Android\sdk\platform-tools

In the tools directory open the monitor.exe (this tool was depreciated in Android Studio 3.0 and replaced with profiler.exe mine is still on the lower revision).

This documentation on the Android site is a good start investigating the profiler:

https://developer.android.com/studio/profile/android-profiler

You can also get into LogCat directly from Android Studio (if you have it open):

Go to  View | Tool Windows | Android Monitor

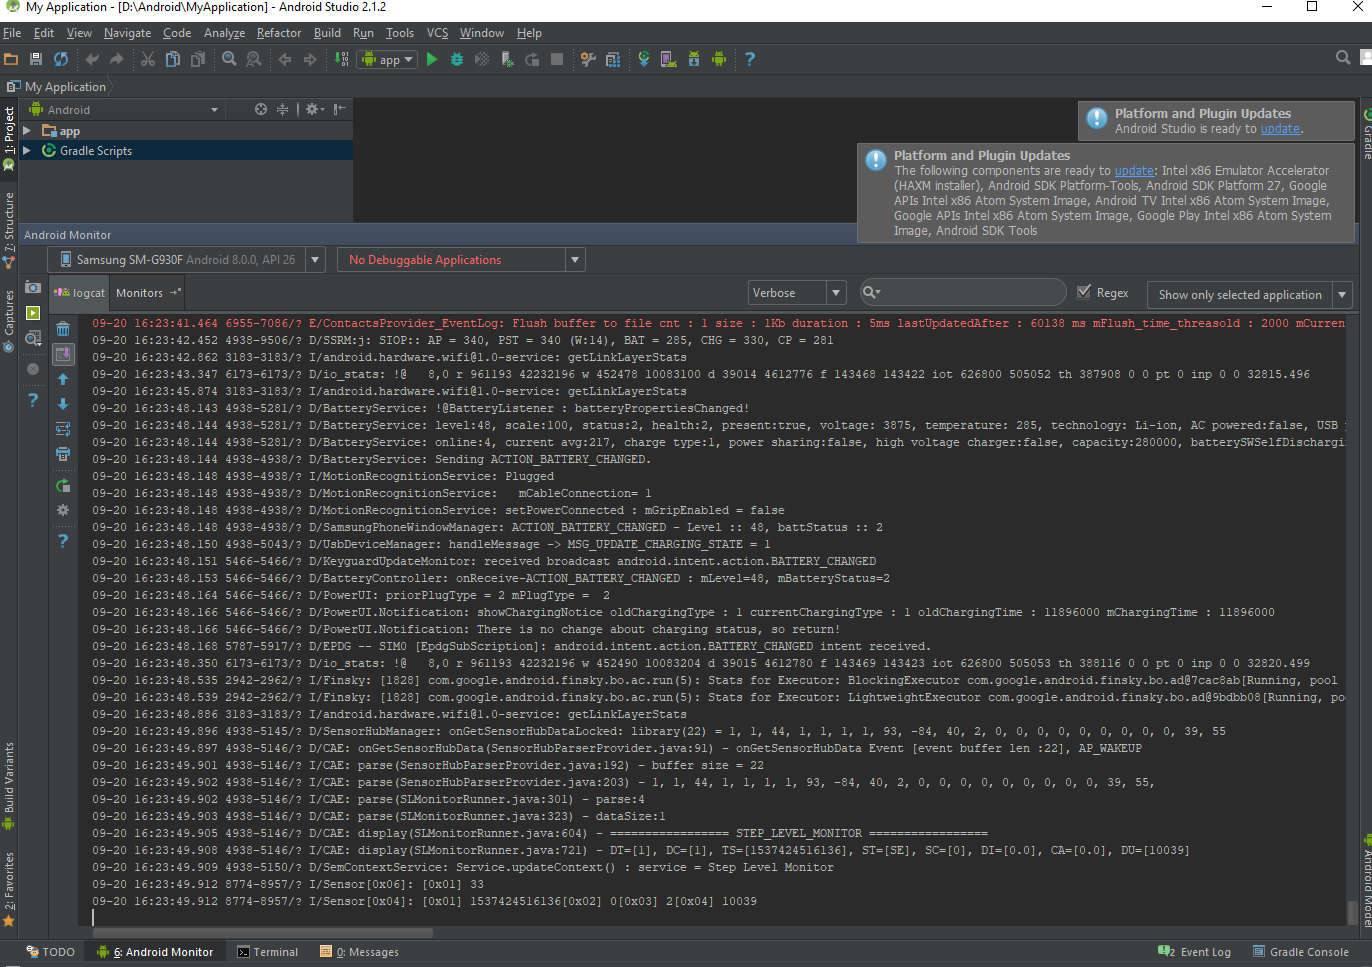
At the bottom of Android Monitor in it’s own tab is the LogCat console window. This contains all of the information about what’s happening in the Android operating system.

As you can see the LogCat console contains a lot. It logs everything.

To filter it type “tag:Unity” in the textbox at the top to see messages that relate to Unity.

Using adb logcat from the command line

Open a command prompt on your development workstation and find the location of your Android SDK platform-tools folder.

Mine was here:

/Users/YourUserName/Library/Android/sdk/platform-tools

If you get this error when you run adb.exe using the command prompt:
‘adb’ is not recognized as an internal or external command operable program or batch file

You can add ‘adb’ to the $PATH environment variable (and restart the command prompt).

setx PATH "%PATH%;C:\Users\AppData\Local\Android\sdk\platform-tools"


To run logcat through the adb shell, the general usage is:

[adb] logcat [<option>] … [<filter-spec>] ..

This is the official Android Developer Logcat Command-Line Tool documentation:

https://developer.android.com/studio/command-line/logcat

but you can get –help on the command line.

It can be handy to know the device id of your Android phone/tablet whatever. This command will help:


C:\Users\<user_name>>C:\Users\<user_name>\AppData\Local\Android\sdk\platform-tools\adb.exe devices
List of devices attached
ce10171a5c19853003 device


You can specify that the log spew into a file instead of into your console (the console is pretty much useless as there is too much to scroll through).


C:\Users\<user_name>\AppData\Local\Android\sdk\platform-tools\adb.exe -d logcat > adb_logcat_out.txt
-d use USB device (error if multiple devices connected)

logcat show device log (logcat --help for more)
-s SERIAL use device with given serial (overrides $ANDROID_SERIAL)


The default Log Location on my machine was:
C:\Users\<user_name>\AppData\Local\Temp\adb.log

A few seconds of output got me a 6.5 MB file so a bit of filtering is advisable

If you run into trouble with the adb server just kill it and restart.


C:\Users\<user_name>\AppData\Local\Android\sdk\platform-tools\adb.exe kill-server

C:\Users\<user_name>\AppData\Local\Android\sdk\platform-tools\adb.exe logcat -s ce10171a5c19853003 DEBUG

C:\Users\<user_name>>C:\Users\<user_name>\AppData\Local\Android\sdk\platform-tools\adb.exe logcat -s ce10171a5c19853003 DEBUG
* daemon not running; starting now at tcp:5037
* daemon started successfully
--------- beginning of main
--------- beginning of system


If you want further help check out these pages from the Unity Manual and Tutorials:

https://docs.unity3d.com/Manual/TroubleShootingAndroid.html

https://docs.unity3d.com/Manual/LogFiles.html

https://unity3d.com/learn/tutorials/topics/mobile-touch/building-your-unity-game-android-device-testing

As a final word I’ll also direct you to this package called Device Console on the Unity Asset Store. I’ve not used it but it looks really good and for fifteen dollars might save you a lot of hassle.

https://assetstore.unity.com/packages/tools/utilities/device-console-44935

Key Quest! Google Play Store Key Signing and the Pain of a Long Slow Death

Should Google Manage Your Keys for Games built with Unity?

We recently had a problem that caused weeks of pain and struggle and it had nothing to do with coding. It was the damn java keystore signing process that we signed up for on the Google Play Store.

The basics are that the Google Play Store requires that all APKs be digitally signed with a certificate before they can be installed.  Apps must use the same certificate in order for users to be able to install new versions or updates.  This is a good and secure system. No issues here.

If you lose your key you cannot distribute any updates to your app/game. This would be really bad for some companies so Google offers to keep your keys safe so that you if you did lose them you can ask to have the key sent to you which gives you authority distribute again. Yay for Google!

But our problems start here in Unity when you build your game for Android the keystore is defined on the Player Settings tab of the Build Setting (CTRL+SHIFT+B).
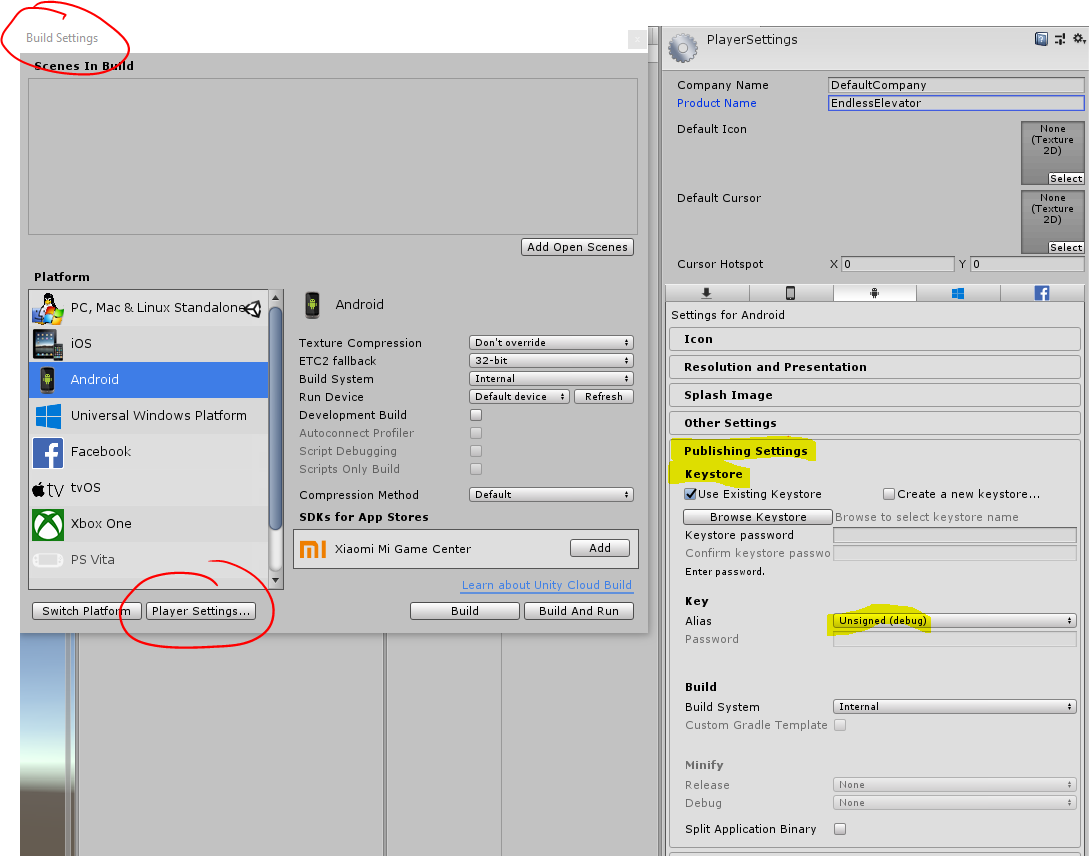
In the first case when running your project from Unity the package (APK) is automatically signed with a debug certificate generated by the Android SDK tools. The debug keystore and certificate are in $HOME/.android/debug.keystore.

This debug certificate is insecure by design and can’t be used on the Google Play Store for publishing an Alpha release but you can upload it for Beta releases.  I think this is where we started going wrong.

When you upload an APK to the Play Store you can opt in to app signing by Google Play. They recommend it but it’s optional. If you prefer, you can continue managing your own keys.

The advantages of opting in to the Google Play Store App Signing program is that 1. You ensure that the app signing key is not lost. 2. If your app signing key is compromised only a user with an account linked to your app can manage an upload key which makes it harder to do something malicious. (If you sign in your apps are signed with an upload key proving your credentials – Google then manages your APK and assigns it the correct and valid signing key).

To quote their documentation: “When using Google Play App Signing, you will use two keys: the app signing key and the upload key. Google manages and protects the app signing key for you, and you keep the upload key and use it to sign your apps for upload to the Google Play Store.

When you use Google Play App Signing, if you lose your upload key, or if it is compromised, you can contact Google to revoke your old upload key and generate a new one. Because your app signing key is secured by Google, you can continue to upload new versions of your app as updates to the original app, even if you change upload keys.

If you lose your keystore or think it may be compromised, app signing by Google Play makes it possible to request a reset to your upload key. If you’re not enrolled in app signing by Google Play and lose your keystore, you’ll need to publish a new app with a new package name.”

Alright. Read that last bit again. It’s important and why app signing might be a really good idea. If you manage your key yourself and you lose it and want to make an update to your app then you have to publish your whole app again under a different name. Again just to drum that home … If you lose your keystore, the only solution is to upload a new instance of the app to the Google Play Store with a new key, a whole new store listing like it’s a different product, as it will not accept an APK signed with a different key.

See: https://support.google.com/googleplay/android-developer/answer/7384423?hl=en
(Manage your app signing keys) The support team only accepts key reset requests from the Play Console account owner. The account owner can fill out a form and attach the upload_certificate.pem file. Then you can update your keystores and API provider registration.

It seems easy and if you want to read funny people on the internet slagging off the Byzantine process check out the comments under this tutorial:
https://www.youtube.com/watch?v=qGoCF0Et_CU&feature=youtu.be

I was a little lost so I started looking for the help of my peers and of course from Unity.

I found a post from one poor soul who was in the same boat as me and the response from Unity Support was: “What do you want to be supported from Unity side? I see this unrelated to our build process.” So someone needs to have a little talk to that chap.

There are more than a few forum posts around this for Unity (and that last one is for andromo but the subject is the same issue).
https://answers.unity.com/questions/1434637/can-google-play-app-signing-be-used-with-unity-and.html
https://forum.unity.com/threads/android-signing.62137/
https://answers.unity.com/questions/1372982/how-i-can-sign-my-apk-with-an-google-plays-upload.html
https://stackoverflow.com/questions/50608172/unity-google-play-app-signing-issue-and-keystore
https://forums.andromo.com/discussion/1980/important-do-not-opt-in-to-google-play-app-signing

Look – and this is really the bottom line – it all got too frustrating and annoying trying to work out what the hell was going on and since I was only in my third release cycle I just opened up a new App on the Play Store and ditched the old one.  But that’s just not possible for anyone who has an App out there and has no other option. So this is the process to getting that pesky key back.

In the Google Play Store you can see your App Signing Keys here:
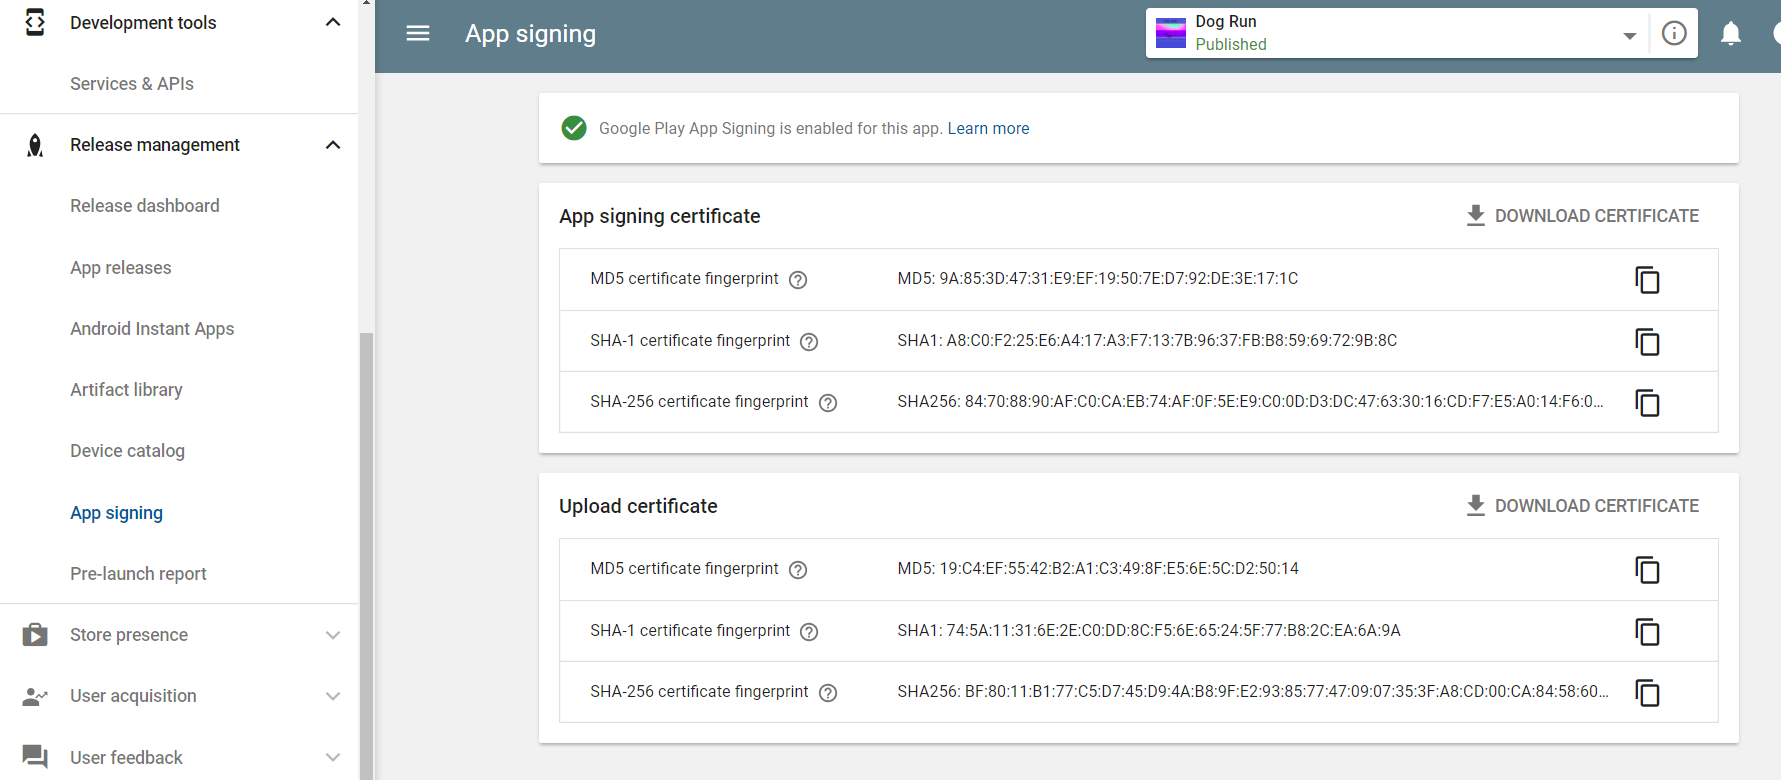
You got your App signing certificate – this is the one that actually signs your app.
SHA-1 certificate fingerprint (above)
SHA1: A8:C0:F2:25:E6:A4:17:A3:F7:13:7B:96:37:FB:B8:59:69:72:9B:8C

And your Upload certificate – this is the one that you use to upload with your APK so that Google knows it’s you.

Your upload key is only registered with Google and is used to authenticate the identity of the app creator.
Your upload key is removed from any uploaded APKs before being sent to users.

SHA-1 certificate fingerprint (above)
SHA1: 74:5A:11:31:6E:2E:C0:DD:8C:F5:6E:65:24:5F:77:B8:2C:EA:6A:9A

In my case the upload certificate was from the default android debug keystore (that I shouldn’t have used):

C:\Program Files\Java\jdk1.8.0_111\bin>keytool.exe -list -keystore C:\Users\<user>\.android\debug.keystore
Enter keystore password:

Keystore type: JKS
Keystore provider: SUN

Your keystore contains 1 entry

androiddebugkey, 10/08/2016, PrivateKeyEntry,
Certificate fingerprint (SHA1): 74:5A:11:31:6E:2E:C0:DD:8C:F5:6E:65:24:5F:77:B8:2C:EA:6A:9A


To generate and register a new upload key, follow the instructions in the Android Studio Help Center.
https://developer.android.com/studio/publish/app-signing#generate-key

You don’t need to use Android Studio you can also do it on the command line (which is easier I think).

First generate a private key using keytool. For example:

# keytool -genkey -v -keystore my-release-key.jks -keyalg RSA -keysize 2048 -validity 10000 -alias my-alias

C:\Program Files\Java\jdk1.8.0_111\bin>keytool -genkey -v -keystore D:\ZuluOneZero\Demo-Unity-Android-key.jks -keyalg RSA -keysize 2048 -validity 10000 -alias Demo4Unity
Enter keystore password:
Re-enter new password:

What is your first and last name?
[Zulu]: ZuluOneZero
What is the name of your organizational unit?
[Unknown]: TheDogRun
What is the name of your organization?
[Unknown]: ZuluOneZero
What is the name of your City or Locality?
[Unknown]: Melbourne
What is the name of your State or Province?
[Unknown]: Victoria
What is the two-letter country code for this unit?
[Unknown]: AU
Is CN=ZuluOneZero, OU=TheDogRun, O=ZuluOneZero, L=Melbourne, ST=Victoria, C=AU correct?
[no]: yes

Generating 2,048 bit RSA key pair and self-signed certificate (SHA256withRSA) with a validity of 10,000 days
for: CN=ZuluOneZero, OU=TheDogRun, O=ZuluOneZero, L=Melbourne, ST=Victoria, C=AU
Enter key password for <Demo4Unity>
(RETURN if same as keystore password):
Re-enter new password:
[Storing D:\ZuluOneZero\Demo-Unity-Android-key.jks]

Note: keytool is located in the bin/ directory in your JDK. To locate your JDK from Android Studio, select File > Project Structure, and then click SDK Location and you will see the JDK location
C:\Program Files\Java\jdk1.8.0_111\bin\keytool.exe
(I used this one but you will have a keytool for every JDK and JRE on your machine – doesn’t matter which one you use)

Then, export the certificate for the new key to PEM format:

# keytool -export -rfc -alias <upload> -file <upload_certificate.pem> -keystore <keystore.jks>

C:\Users\<user>\AppData\Local\GitHub\mingw32\bin\openssl.exe x509 -inform der -in C:\Users\<user>\Downloads\deployment_cert.der -out D:\ZuluOneZero\deployment_cert.pem

Add the certificate to the signing keystore:

keytool -export -rfc -alias Demo4Unity -file C:\Users\roderick\Downloads\upload_cert.der -keystore D:\ZuluOneZero\Demo-Unity-Android-key.jks

C:\Program Files\Java\jdk1.8.0_111\bin>keytool -export -rfc -alias Demo4Unity -file C:\Users\roderick\Downloads\upload_cert.der -keystore D:\ZuluOneZero\Demo-Unity-Android-key.jks
Enter keystore password:
Certificate stored in file <C:\Users\roderick\Downloads\upload_cert.der>

If you want to inspect the certificates (on Windows) right click and open with Crypto Shell Extensions.

Or you can inspect the certificates like this:

C:\Program Files\Java\jdk1.8.0_111\bin>keytool.exe -printcert -file C:\Users\<user>\Downloads\upload_cert.der
Owner: CN=ZuluOneZero, OU=TheDogRun, O=ZuluOneZero, L=Melbourne, ST=Victoria, C=AU
Issuer: CN=ZuluOneZero, OU=TheDogRun, O=ZuluOneZero, L=Melbourne, ST=Victoria, C=AU
Serial number: 3e64dcd1
Valid from: Thu Sep 13 16:28:59 AEST 2018 until: Mon Jan 29 17:28:59 AEDT 2046
Certificate fingerprints:
MD5: F8:D3:CF:84:88:8E:16:EA:3D:74:F0:7E:9E:18:13:C9
SHA1: BD:1B:A2:99:05:11:0E:F6:A0:B5:1A:7B:7D:EB:01:3C:8B:A7:98:6D
SHA256: 7C:24:86:CD:58:1A:2F:74:21:B0:A6:9B:3D:DF:BC:BE:2A:15:F3:23:B9:44:7F:98:5D:8D:FB:24:98:37:82:9C
Signature algorithm name: SHA256withRSA
Version: 3

Extensions:

#1: ObjectId: 2.5.29.14 Criticality=false
SubjectKeyIdentifier [
KeyIdentifier [
0000: 21 44 48 FA 63 97 2D B0 A4 92 2B 38 41 E4 2F 7D !DH.c.-…+8A./.
0010: EA 26 E0 10 .&..
]
]

You can inspect keystores like this:

C:\Program Files\Java\jdk1.8.0_111\bin>keytool.exe -list -keystore D:\ZuluOneZero\Demo-Unity-Android-key.jks
Enter keystore password:

Keystore type: JKS
Keystore provider: SUN

Your keystore contains 1 entry

demo4unity, 13/09/2018, PrivateKeyEntry,
Certificate fingerprint (SHA1): BD:1B:A2:99:05:11:0E:F6:A0:B5:1A:7B:7D:EB:01:3C:8B:A7:98:6D


All the detail above are dummy one’s for demonstration purposes only.

Do NOT Restart Unity After a Crash!

It all started when my laptop went into sleep mode.
I was doing some play testing of my Dog Run game and had to take a work call.
I know I know “real” work getting in the way of my real life.

Something happened and the laptop stopped responding. Wouldn’t come out of sleep mode and had to be restarted.

Now normally Unity is pretty stable. I actually can’t remember any time when it caused a crash or stopped responding or has died on me but I guess being in run mode while the laptop was asleep may have been a contributing factor.

When I restarted my machine and opened my Game again in Unity the editor barfed and gave me an error in the console like:

GetPathNameExtension(path) == “unity”
Unknown error occurred while loading ‘/Scenes/MainScene.unity’.

Then it asked if I would like to open the default scene which I promptly took to be My default scene. But sadly it wasn’t. It was the Unity default scene that you see when you open up a new project.

All of my assets and settings were gone. All those hours of tweaking objects’ positions and rotations getting things just right were wiped off the board like an angry chess master.
Poo.


This is the big lesson of today.

If the Unity Editor or your operating system crashes do NOT start Unity again without making a backup!

I know there are a few other lessons here like: 1. Always backup your project, and 2. Use source control, and 3. Backup your project again, and 4. Save your project regularly during your workflow and 5. Save the scene and the project BEFORE hitting Play when you are testing your game.

But I want to say it again because opening your project up after a crash in Unity is a really easy thing to do and seems like the right thing to do and is normal and natural and good. But it’s NOT!

DO NOT OPEN UNITY AFTER A CRASH!

Not without first backing up your project folders.

Now I know backup is a whole subject in itself and I’m going to make an entry on that soon but there are some simple ways to save the day here.

When you hit the Play button in Unity the scene and all the running elements are saved in the project’s Temp directory.

If you have a crash and want to restore your scene file, you cannot re-launch the Unity Editor after the crash.
If you do it will blow away the Temp directory and you will lose the last saved scene and all your progress with it!

Inside your Project directory folder there should be a Temp/__Backupscenes directory. If you are lucky in here you will find a file called either 0.backup or “__EditModeScene” (depending on Unity version) which is your saved scene file.

First! Make a backup of your Project directory. Take the whole thing. Easiest quickest way is to copy the whole project folder to another directory.

Then all you have to do is to copy this file back into you project and replace the broken scene file with the copy. Set the file extension to .unity in order to make this file recognizable as Unity scene file.

Please backup your project folder before making the change.

When you Run Unity and open the Scene you just moved from the Temp folder hopefully all or at least most, of your changes are there and the scene is restored.

So Unity is saving your scene every time when you hit the play button, but not over the original scene file, instead it is saved in the project’s Temp directory.

But be careful. You cannot start the Unity editor after the crash. This is by nature a Temp directory whose content is created dynamically when working in Unity.
If you restart you will lose the scene file and all the progress with it.

Once you have done this start using a new workflow.
Take regular backups.
Use source control.
Hit Save regularly while working in Unity.
Hit Save before you hit Play when testing in Unity.

Animating the Running Dog with Unity and GIMP

I finally got the game I started in November into some semblance of how I wanted it to look.  The running dog animation anyway.  Still playing with different backgrounds but this one is sure “fun”.

It took a long time to get all the dog actions done drawing each one by hand and getting a lot of unsatisfactory results.  The animation is all “flip-book” style with each frame a different drawing.  There were between 70 to 80 pictures for the entire set.

The art was done in gimp with the help from some nice veterinarian manuals on the dog gait.

I mocked up a few transitions from an opening scene to a nice zoom down to playing position.

Then moved between a sedate walk to a running gallop and a little jump.  She looks like she’s really flying now!


During this time I also had a big problem with corrupted a scene after playing in the Animator window.  Big tip and future post – do not restart Unity if it crashes without taking a copy of your temp directory first. It took me about two weeks to rebuild everything but more on that later.

How To Get Beta Testers

Yay! We Are In Beta!

When ZuluOneZero published NumBlocks on the Google Play Store we went through the requisite development phases.

The game has been released now – have a play:
NumBlocks published on the Google Play Store for Android.

Click to Play:

Also on the Amazon Play Store for Android and Kindle.

Click to Play:

This was our first app that we thought looked good enough to give away to real users.
I was very proud of the artwork and how the game played on screen.
It’s a simple no-frills game but it was a perfect test platform to scope out what’s required to get a game published.
Which incidentally is a little daunting but in reality the whole process of publishing a game on the Google Play Store was pretty easy.
The Google Play Console was easy to use and there were plenty of official and community references to help us through it.

Uh Oh … Problem …

We went through several development iterations and found a revision that worked on most Android platforms.
We were running Unity 5 and targetting all mobiles above Android API 15 4.03 called “Ice Cream Sandwich”.
Not being a big shop our test devices were old personal phones that were around this API version. It was running well and looked great an a VM but once we started using our physical test devices we found a few issues dealing with different screen resolutions and one phone didn’t have enough resources to run the random number generator so that the same numbers kept spewing out.

Then we upgraded to Unity 2017.1.0f3 and lost support for those older API’s. Oops no more supported hardware to test on! We really needed to get some Beta Testers who could trial the game on a variety of different platforms that we couldn’t access. We could test thoroughly with virtual machines but as we found when testing on real phones there are some things about how the game looks and plays that can only be reproduced on the real platform.

Solved! (Not!)

So our marketing team (Harmony and Felicity) and I did some research on recruiting Beta Testers and we quickly realised that we couldn’t affort to pay for the service.
We did find a wealth of paid services out there which I’ll list below in case someone can make use of that information.

Not all of these services were paid but most of them required some sort of effort or buy-in up front that we couldn’t match.

http://appstorm.net/
http://appuseful.com/app/add
http://betacandy.com/
http://betali.st/
http://betalist.com/
http://betapage.co/
http://betatesters.io/?utm_source=InstabugBlog&content=betatestbeginnersguide
http://erlibird.com/

Ready to introduce your startup to the world?


http://makeuseof.com/
http://market.thenextweb.com/
http://momb.socio-kybernetics.net/

Contact us


http://quora.com/
http://startupli.st/
http://startuplift.com/
http://web.appstorm.net/
http://www.betabound.com/
http://www.betabound.com/announce/
http://www.mob4hire.com/

Submit Your StartUp

Submit

Submit Startup


http://younoodle.com/
https://betafamily.com/
https://feedmyapp.com/
https://inspiredbeta.com/
https://www.topcoder.com/
https://www.usertesting.com/
https://www.utest.com/

Social Media Save Me!

So we turned our attention to the online communities that might be able to assist us.
We did some more research and found that social media is literally teeming with sites and groups that want to Beta Test your app. Awesome. Problem solved.

We published a Beta version of the app on the Play Store and mocked up some Beta Testing campaign ideas along with a set of goals that we had for Beta Tests. We were looking for technical testers as opposed Marketing and I can tell you I was pretty excited about getting some feedback on the game. When we pubished the Beta version of the game we could choose a number of Beta testers that the game would be released to. The interface gave us a minimum of 1000 users so we went with that and given the number of social media sites we found thought that this didn’t sound all that unreasonable.

This is a brief list of the social media sites and lists and groups that we advertised for Beta Testers on….

Google Communities:
Android Beta Tests
https://plus.google.com/u/0/communities/109783274236354693762
Android Game Developer
https://plus.google.com/u/0/communities/107240075790372473394
Indie Game Developers
https://plus.google.com/u/0/communities/116817422244345691332
Game Developers
https://plus.google.com/u/0/communities/100673606633986699530
Game Developers
https://plus.google.com/u/0/communities/101640237427303194102
Game Programmers
https://plus.google.com/u/0/communities/102656807509358954492
Mobile Game & App Developers
https://plus.google.com/u/0/communities/107514033174068960125

http://www.reddit.com:
/r/TestMyApp
/r/alphaandbetausers
/r/AndroidAppTesters
/r/startups
/r/betatests
/r/androidapps

https://twitter.com/:
search?q=%23Betatesting%20&src=typd
search?q=%23Betatesters&src=typd
search?q=%23Testmyapp&src=typd
search?q=%23Indiedev&src=typd

We even did a big call through our Facebook Page and Blog.

Big Reveal!!!

Guess how many Beta Testers came flocking to try out our great new game…..

None. Zero. Zilch. Nada. Not one.

We checked around the boards on these sites and groups and actually found very little actual Beta Testing going on.
After a few weeks of interacting with these communities and even testing a few apps ourselves thinking that we might get some kind of Beta Testers Karma we still found that no-one really wants to test your app (unless maybe if you are building a huge free MMO that’s going to be awesome – anyone doing that?).

Free Advice!

So there you have it – Beta Testing using social media groups doesn’t work. You don’t get nufin’ for free in life.

So my advice to you is that if you don’t have one already, start building an email list now. For a startup game dev studio with no support framework it’s pretty hard to come by free help when you need it. Ideally, start collecting email addresses before you even have an app, and keep at it! Because even a handfull of Beta Testers is better than none.

The Five Games in Ten Weeks Challenge!

Some months back I went to a local presentation by the Unity champions at The Arcade (a collaborative workspace specifically for game developers and creatives) in Melbourne.  It was one of those “learn about others and gain insight into one’s self” moments.  One thing I picked up from one of the presenters from Hipster Whale (makers of Crossy Road) was that when they were developing a new game they tried to keep the proof of concept to a two week period.  Some time later with this in mind I presented to myself the “Five Games in Ten Weeks Challenge!” to see if I could really push out five different games in ten weeks.

Five Games in Ten Weeks

Continue reading →

New Game! Peace Run

Hi Zulu here  – We started work on a new game this week called Peace Run.  I wanted to do a continuous runner and really liked the idea of having a line drawing animation that looks like the player character “grows” out of the line.  The runners will be animal silhouettes like the dog shown here.

Doing the frame by frame animation has been really fun but it took a lot of trial an error to get to this point – which as you can tell isn’t perfect yet.

All the artwork was done in GIMP 2 and the game design is in Unity3d.  We used a simple animation script to play the start of the walk sequence.  I can’t wait to get this puppy into a run and a full sprint.

BETA Testers wanted! NumBlocks

Hi Zulu here – we just got our latest game NumBlocks into the Play Store and have opened it up for Beta Testing.

https://play.google.com/apps/testing/com.ZuluOneZero.NumBlocks

NumBlocks is a fun numbers game that’s easy to learn but hard to master.

This is our first game in the Play Store and is a great test bed for us.

We wanted something small and simple that looked good in action and was fun – NumBlocks was our answer.  It was the front runner to our “Five Games in Ten Weeks” challenge and broke a lot of new ground for us.